
This awesome template lets you enter, share, and publish your lesson plans using – yes, that’s right – a Google sheet!
Using the Template
- Click the link above. You should be “asked” to make a copy.
Note – If your computer skips this step and takes you directly into the spreadsheet, just pull down the File menu to Make a Copy. - Click the “Add/Edit Lesson Plans” tab at the bottom of the page to enter your plans.
- Click the “View Week” tab and enter Monday’s data to view only the current week.
Overview
- Enter your entire year’s lesson plans on the “Add/Edit Lesson Plans” sheet.
Optional – Collaborate with another teacher by sharing the spreadsheet. - Enter Monday’s date on the “View Week” sheet to view only the current week’s lesson plans.
Optional – Publish the “View Week” sheet as a webpage to be viewed by admin, parents, and students.
Detailed Lesson Plan Instructions
Getting Started:
- Click the “Enter/Edit Plans” tab at the bottom of the page.
- Change the subjects to your own.
- Enter the dates for the week.
Important! Do NOT enter the Day of the Week. When you enter the date, the day will automatically appear!
Tip! Start each week with Monday date, even if you don’t have school! - Resize columns, change fonts, sizes, alignments, and colors, and add borders as desired.
.

Collaborating with Another Teacher
Do you team-teach with someone else? Want to both enter lesson plans in this one document? Just use the sharing option to do that!
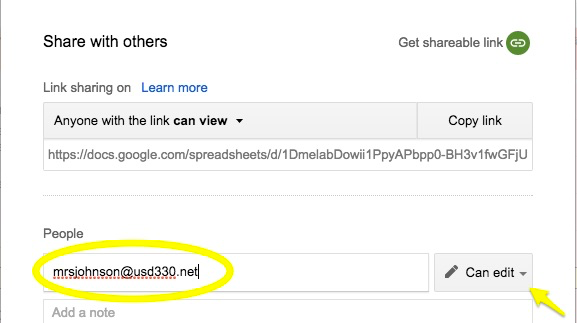
- Click the blue “Share” button at the upper right side of the page.
- Enter the other teacher’s email address and choose “Can edit.”.
Note – the teacher must have a Google account. - Click “Done.”
.
Viewing Current Week
- Click the “Week View” tab at the bottom of the page.
- Enter Monday’s date. This is ALL you need to enter!
- The week’s will automatically fill in with the info from your “Add/Edit Plans” sheet!
- Change the colors, fonts, sizes, etc. as desired.
Publishing the Current Week
Want to make your lesson plans available to admin, parents, and/or students? You can turn your “Week View” sheet into a web page!
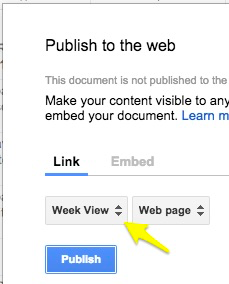
- Pull down the File menu to “Publish to the web.”
- Choose to publish the “Week View” as a web page.
- Click the “Publish” button.
.
- Copy the provided URL.
.
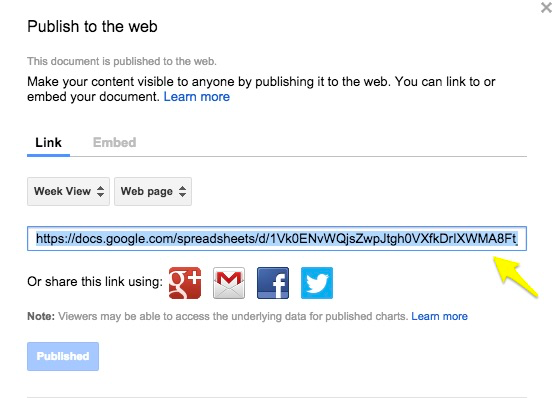
- Provide the URL to others.
a. Link to it from you blog, wiki, or webpage.
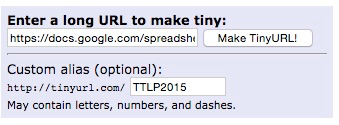
b. Shorten the URL using goog.gl, bit.ly, or tinyurl.com (my favorite!).
.
 c. Use goqr.me to embed the link into a QR code.
Note – it is best to use a URL shortener first! - Whatever is showing on the “Week View” sheet will be published for others to see. As you change Monday’s date, the published web page will automatically re-publish and stay up-to-date!
Other Tips and Tricks
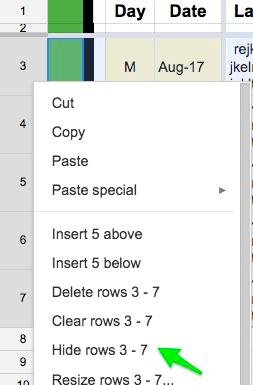
- In the “Add/Edit Lesson Plans” sheet, hide rows to make the view more compact.
Select the desired rows, right-click, and choose “Hide rows…”
.
- Use copy/paste/character to add fun characters to your lesson plans. ✿☆✄
- Feel free to adapt the template to fit your own needs!
Please enter any questions or comments in the provided area below.

Hi Tammy…..I adapted your old one that I got from you several years ago….love it. BUT….I want to use this one, and need to add subjects. They don’t appear on the week view when I add them. Is there a quick and easy way to add more subjects? Thanks for this great resource.
Hi Brad,
You’ll need to “tweak” the formulas to make additional subjects appear:
1. Go to the “Week View” sheet.
2. Locate the header for column R. Click one of the triangles beside it to expand the hidden columns.
3. Double-click cell U5 to reveal the formula: =if(E5=””,””, filter(‘Add/Edit Lesson Plans’!F:M,’Add/Edit Lesson Plans’!E:E=E5))
4. In the middle of that formula, you’ll see “F:M”. Change the “M” to the desired column. If you need to show two additional subjects, the range would be F:O instead of F:M. If you need three more subjects, it would be F:P.
5. Repeat step for for cells U6, U7, U8, and U9.
Note – If you need to need more than 4 additional subjects, you will need to insert some more columns in the Week View sheet. Let me know if you need more help with this.
I hope this helps!
– Tammy
Thank you so much Tammy for the great lesson plan template! I also saw that you were presenting at TCEA in Austin this Feburary and am VERY excited to hopefully attend some of your sessions!!!!
Thanks again for sharing your knowledge and helping teachers become better!
Hi Tammy,
Thank you so much for sharing this template! I am excited to use it this year! On your example I like how you put Labor Day going across the whole row. Can you teach me how to do that?
Thank you!
Hi Darlene,
Thanks! Yes – just select the desired cells and then click the “Merge Cells” button in the toolbar. Here are more detailed instructions in case you need them: https://support.google.com/docs/answer/141104?hl=en
Good luck!
– Tammy
What a great idea! I’ve been looking for a way to do my lesson plans on the computer, but don’t have budget money to pay for a service. I will definitely try this. I love that I can share them with parents and only have to enter my plans once! Thanks, Tammy!
Thanks, Jaime! I’m glad you’re finding the template useful. Let me know if you think of ways to improve it.
– Tammy