
Google’s Blogger tool is amazing and so easy you won’t believe it. Give it a try! You can have a blog/website online within 5 minutes – I promise!
Creating a Blog Using Google’s Blogger Tool
Getting Ready
- Go to: www.blogger.com
- Sign in using your Google login information.
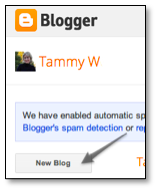
- Click the “New Blog” button.
- Enter the desired title for your blog.
- Determine what you want the address (URL) to be for your blog.
- Choose a template.
- Click the “Create Blog” button.
Adding Posts (Messages)
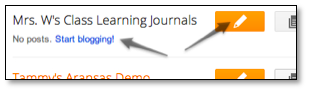
- Click the “Start blogging” link or the pencil icon.
- Add a title for the post and enter your message. Click the “Compose” tab for more advanced editing options.
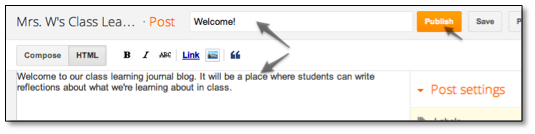
- Click the “Publish” button.
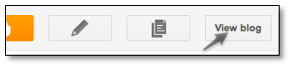
- To see your published post, click the “View Blog” button at the top of the page.
The Design/Edit View
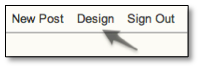 To make changes to your blog, you’ll need to be in the design/edit view to get there from your published blog, click the “Design” link in the upper right corner.
Adding More Posts/Messages
 Use one of the following options to add more messages/posts to your blog:
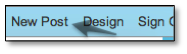
- When viewing the published blog, click the “New Post” link at the upper right.
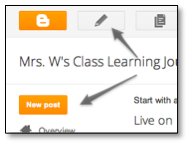
- From the design/edit view, click the “Pencil” icon at the top of the page.
- From the design/edit view, click the “New post” button at the upper left.
Editing a Post/Message
Use one of the following options to edit messages/posts in your blog: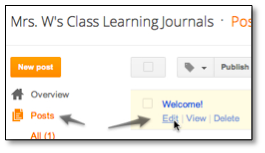
- When viewing the published post, click the pencil icon at the bottom of the post.
- In the design/edit view, click the “Posts” link at the left and then click the “Edit” link under the post you want to edit.
Deleting a Post/Message
- In the design/edit view, click the “Posts” link at the left and then click the “Delete” link under the post you want to delete.
Changing the Post/Message Options
- In the design/edit view, click the “Layout” link at the left side.
- Click the “Edit” button in the “Blog Posts” area.
- In the “Configure Blog Posts” window, make any changes you want. Then click the “Save” button at the bottom.
Changing the Look of Your Blog
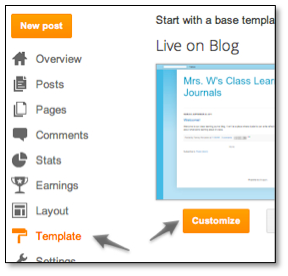 In the design/edit area, click the “Template” link at the side of the page.
- Scroll down the page to see the different template options.
- Click to choose the one you want.
- To customize the template, click the “Customize” button.
This will open the template designer. - Use the provided options in the template designer to change the background, adjust widths, change the layout, or to change individual colors, fonts, etc. (advanced).
Getting Back to Your Blog
Once you’ve closed your blog, you can get back to it to add more posts in one of these two ways:
- Go directly to the address/url you assigned your blog when you created it. (See step 5 on page 61)
- Go to www.blogger.com and log in to your Google account. You’ll see a list of all the blogs you’ve created.
Creating Additional Blogs
You can create multiple blogs for different purposes. Just go to www.blogger.com and click the “New Blog” button to create another one.
Getting Others to Your Blog
You’ll most likely want to share your blog with students, parents, and others. You can:
- Put your blog’s URL in a printed document such as a letter to parents, a class newsletter, a note home, etc.
- Link to the blog from your school/classroom webpage

Share your Comments!